 Draw Stairs
Plan3D allows you to draw most kinds of stairs in your plans. Stair riser heights are kept within acceptable limits and other complex stairs geometry standards are maintained for ease of use.
Contents
Cutting Floor Holes for Stairs
About Stairs
Become familiar with the various parts of stairs so you can use them in your plans:

Round Fronts: Set the stair steps to have rounded fronts as an option. This may also be set under stair properties.
Support Frame: You may add supports to stairs by right-clicking them and unchecking "Hide Supports." This may also be set under stairs properties.
Build Support Walls: This builds support walls under stairs. These are just regular walls with points added to support the stairs. You may also add your own walls around stairs manually.
Editing Modes
When working with stairs, you will switch between wireframe and finished modes depending on what you are editing. This is done to make it easier for you to see what you're doing when you edit stairs.
There are two editing modes:
Wireframe Mode: This is the mode with stairs completely hidden except for handles and the wireframe bounding box. You will see this mode when you first draw stairs and when you edit the blue and red handles on the stair footing. Just double-click to see finished stairs.
Finished Mode: This is the mode you want to see when stairs are completed. It is also one the modes you'll see while editing stairs. Handles will be available if the stairs are selected but you still see the actually stairs.
Draw Stairs
Choose Build>Draw Stairs and draw a stair's shape on the work grid. Where you click down is the bottom and where you let up is the top of the stairs.
Example:
Stair Top Height
In finished mode drag the top pink corner handle to adjust the height of the stairs to the next floor or landing. Stairs will snap to the top of a floor when you get near it.
You may not raise stairs so high that riser heights exceed normal ranges. If needed, lengthen stairs to add more steps - or shorten the span if the stair height needs to be lower..
Cutting Floor Holes for Stairs
See Build>Cut Hole for ways of cutting holes in floors.
Select Stairs
Double-click stairs to select them. You may also right-click the stairs and choose "Select Object" from the pop-up menu.
When selecting stairs there are two modes:
Finished mode: Double-click stairs to switch from finished to wireframe mode.
Wireframe mode: Double-click stairs to switch from wireframe to finished mode.
Delete Stairs
Select the stairs and press the Delete or Backspace key. You may also right-click stairs and choose "Delete" from the pop-up menu.
Move Stairs
Click on the stairs and drag to move them where you want.
Hide Stairs
Right-click stairs and choose "Hide." See View>Show All to un-hide stairs.
Lock Stairs
Right-click stairs and choose "Lock." Repeat to un-lock.
Reshaping Stairs
By changing the foundation shape with Ctrl-click and then dragging new handles, you can create stairs of different basic shapes. Ctrl-click again to delete red handles.
Rounded Stair Steps: Right-click the stairs and choose "Round Front."
Duplicate Stairs
Select the stairs and choose Edit> Duplicate. Or hold in the Q key and drag stairs. Should you want to repeat duplication to create rows of stairs, choose Edit>Duplicate again after a Q-drag to repeat duplication of stairs in the seem direction at the same offset. Stairs in the illustration below were created in this way.
Setting Stair Level
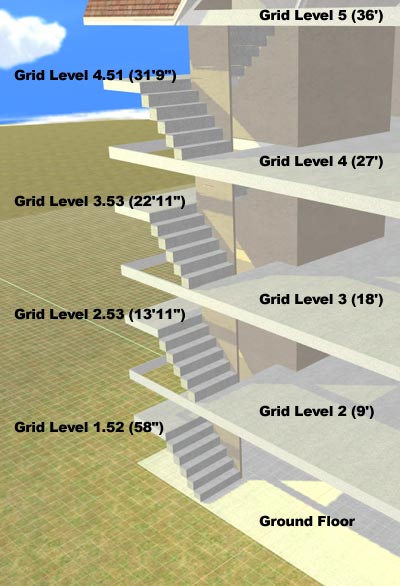
Stairs draw on the current work grid.
In the illustration below, stairs and landings were drawn at each level. Holes are drawn in floors above stairs as needed. You can set the work grid to any height you want with Edit>Move Work Grid.
Rotate Stairs
Select the stairs and rotate them with the square rotation handle in the middle front corner. Rotate the handle in a circular motion.
Stair Size and Properties
To set many of the stairs properties described below, you'll need to right-click stairs and choose "Properties."
Height of Stair Top: There are several ways to adjust stair height:
Raise the pink handle at the top of the stairs. The top of the stairs will snap to the upper floor level it is closest too.
Right-click the stairs and choose "Properties" and set height.
Important Note: Riser height has to stay within an acceptable height range (low enough where people can step up.) If you are stopped from raising the height of the stairs you'll need to increase the span of the stairs by dragging the blue handle at the bottom of the stairs outwards so additional steps can be added
Length or Span of Stairs: Drag blue handles at the stair bottom and stair top sides of the wireframe to increase the number of steps.
Width of Stairs: Drag blue handles at sides of stair foundation. You may need to double-click the stairs to see the bottom frame handles better in wireframe mode.
Step Risers: Raise or lower the stair height and stair length. The risers will be automatically adjusted to fit as long as they are within acceptable height limits. To see the riser height right-click stairs and choose "Properties." Riser height is shown next to the "Show Risers" check box.
Step Depth: Right-click stairs and choose "Properties." Set the depth there. You'll need to lock it if you plan on changing the stair length or height.
Step Thickness: Right-click the stairs and choose "Properties" and set thickness.
Step Overhang: Right-click the stairs and choose "Properties" and set overhang.
Paint and Materials
You may apply color and materials to different parts of your stairs. For example, make the supports metal, and the steps carpeted. Or apply wood to a riser and carpet to the stair top. Hold in the Alt key when dragging in paint and materials to apply a material to all parts of stairs simultaneously.
See Paint and Colors and Materials and Textures for more information.
Stairs with Landings
Landings are used to fit stairs into restricted spaces. U-shaped and L- shaped stairs are examples.
Stairs with landing are created using the following steps:
Draw floor to size of landing.
Raise floor up with pink handle to landing height.
Draw lower stairs to landing.
Adjust height handle so stair top lines up to landing.
Use blue handles to set stair width to landing width.
Press pageUp to move Work Grid to the landing.
Draw stairs on landing.
Adjust height so stair top lines up to second floor.
Examples: