 Draw Roof
Easily create these common roof styles.

Contents
Draw Roof
Use the following steps to draw a roof:
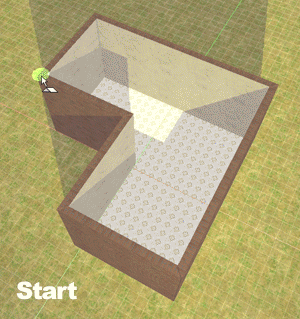
Create a structure to put the roof on.
Choose Build>Draw Roof.
Cursor changes to a transparent disc to gauge drawing height
Position disc on wall top before drawing.
Click-and-drag from one corner of the wall top to the other.
In wireframe, drag blue handles to outer wall edges to snap in place.
(Edit roofs in wireframe mode or finished mode - whichever works best.)
Note: Also see Roof tutorial.

Select Roof and Roof Mode
Select a roof by double-clicking it. You may also right-click the roof and choose "Select Object."
There are two selection modes when working on standard roofs:
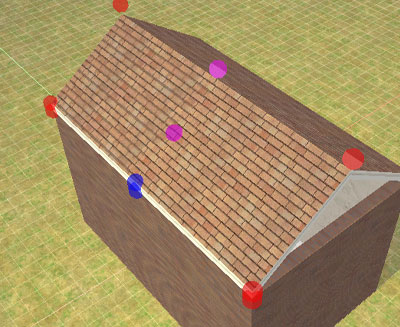
Finished Mode: When you select a roof and it is solid this is "Finished mode." To switch to wireframe mode double-click the roof again.
Wireframe Mode: When you first draw a roof or when you double-click a roof that is in finished mode, it will switch to wireframe mode. You can edit roofs in either mode.
Rotate
In wireframe mode rotate the square handle shown in a circular motion. Hold in the shift key to disable snap.
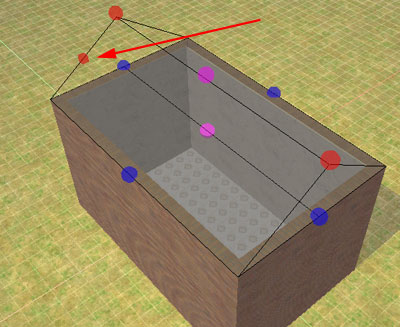
Peak
The peak handle is the top center pink handle between the two red handles. The peak can be adjusted vertically and horizontally:
Vertical Height: Drag peak up or down.
Horizontal Position: Hold in shift key and drag the peak left or right to offset the handle for Salt-Box roofs.
Example:

Height of Roof
In wireframe mode adjust roof elevation with the pink handle between the blue handles.
In finished mode adjust the pink handle between the peak and blue handles on the selected roof side.
Example:
Delete
To delete the entire roof, double-click it to get in to wireframe mode and press the delete or backspace keys.
You may also delete half of the roof in finished mode for special purposes - although Build>Construct Roof (custom) may be a better solution.
Move
Click-and-drag the finished roof or the semi-transparent part of a wireframe roof to slide it around at current height.
Hide
Right-click a roof and choose Hide from the pop-up menu. In wireframe the whole roof is hidden. In finished mode only the roof half you right-click will be hidden.
Hide All Roofs by choosing View>Hide>Roofs or press the R key. Show Roofs by choosing View>Show All.
Lock
To lock a roof so you can't accidentally change it, right-click it and choose "Lock." Unlock it the same way.
Right-click the roof, choose "Properties" and set reflectivity as a percentage - where a mirror is 100% and no reflectivity is zero.
To turn on reflections see
Edit> Improve Edit Speed> Turn
Off Reflections or just press the "M" key. The green dot
next to the "M" on the tool bar indicates reflections are on.
Note: Reflectivity requires more rendering power because plan3D has to
re-render this reflect image in the countertop. This requires plan3D to
do double-rendering. If you have a slow computer or video card you should
probably turn off reflections when you're editing. See Edit> Improve
Edit Speed for more information.
Resize Roof Area
The roof area is the foundation - the part that sits on top of a structure. Roof area is defined as a rectangle, even if the roof edges are reshaped to hang below it.
You cannot change the roof area in finished mode.
In wireframe mode adjust the blue handles. They'll snap to roof edges if you get close. Hold in the shift key if you need to disable snap.
Overhangs
Create overhangs In finished mode by dragging blue handles downward. To define a subsection for an overhang, Ctrl-click roof edges to add and delete handles.
Adjusting Roof Edges
Drag blue or red handles on finished roofs to extend roof edges or sides. Hold in the shift key to disable snap to when dragging.
Define width of overhangs by holding down the Ctrl key and clicking roof edges in finished roof mode (not wireframe.) Also use the Ctrl key to delete red handles on the edges of finished roof edges (not wireframe.)
Example:
Reset Roof Edges
If roof edges are not working as you expected and you want to reset them and start over, right-click the roof and choose "Reset Roof Edges."
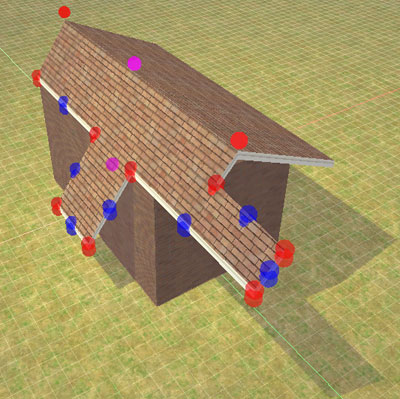
Hipped and Connected Roofs
Create hipped and connected roofs by dragging the top red handles inwards or outwards.
Example:
Paint and Materials
Apply shingles to roof tops by dragging them in from the Directory. Apply ceiling materials and paint to the bottoms of roofs from the Directory also. See Paint and Colors and Materials and Textures for more information.
Cut Holes in Roof
Use Build>Cut Hole to cut holes in your roofs.
Fit Wall to Gabled Roof
Here how to add a point to the top of a wall and fit it to the roof peak:
Create walls and draw a roof on them (Figure 1).
Hold in the Ctrl key and move the mouse over a wall edge. (Figure 2.) A dot will appear at the arrow cursor to indicate you may click to add a point to it.
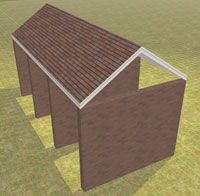
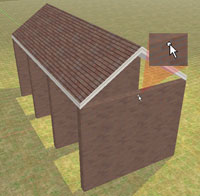
Figure 1. Figure 2.
After you Ctrl-click the wall top, you'll see a red handle at that point (Figure 3.)
Drag the red handle up under the roof peak to snap it into place (Figure 4.)
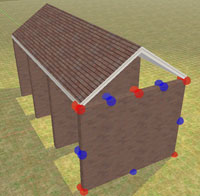
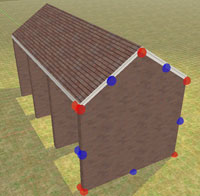
Figure 3. Figure 4.
Skylights
Skylights may be dragged onto roofs from the Directory> Building Materials> Windows> Skylights (Velux).
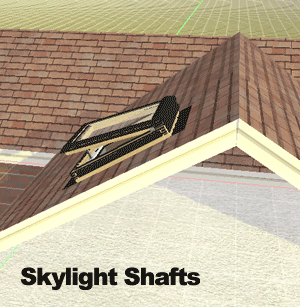
Add Ceiling Shafts: If you have a ceiling under the skylight and you want to drop a shaft to it, right-click the skylight and choose "Create Shaft" and type of shaft. Right-click shafts and change their flare as well.
Skylight Pitch: If you change roof pitch with Velux skylights, plan3D will add a support to it below 15 degrees automatically.
Odd Roof Types
Virtually any roof type you can't create with Draw Roof may be created with Build>Construct Roof (custom).
Dormers
Dormers may drawn on roofs using Build>Draw Dormers.