 Draw Molding
Molding can be used for many purposes. See examples below.
Contents
Examples
 Draw Molding
Molding may be drawn on a wall, roof, countertop or floor.
In 3D mode draw a 10 x 10 floor
Choose Build> Draw Molding> Rectangle.
Click-and-drag to draw molding across the middle of floor as shown below.
Example:
Important Note: Molding is attached to the wall, floor, countertop
or roof you draw it on. For example, if you draw molding on a wall and
move the wall, the molding will move with it.
Select Molding
To select molding so you can manipulate or delete it, click it once or right-click it and choose "Select Object." The molding is selected when you see handles on it (not on the wall.)
Resize Molding
There are several ways to resize molding:
Right-click molding and choose "Set Dimensions." Enter the exact size you want the molding to be.
Right-click molding and choose "Properties". However, this only allows setting the depth and height. Set length with red handles or use Set Dimensions above.
Drag handles only molding to change shape and size visually:
Blue handle: Width
Red handle: Length
Green handle: Depth
Pink handle: Pulls molding away from wall
Delete Molding
Select the molding and choose the Delete or Backspace keys. You may also right-click the molding and choose delete from the pop-up menu.
Move Molding
Click-and-drag the molding and slide it in any direction parallel to the floor, roof, ceiling, wall or countertop it is attached to. Pink handle pulls it away from its slab.
When you drag the molding it will be constrained to that direction. If you drag at an angle you may position it freely.
Duplicate Molding
Duplicate molding by holding in the Q key and dragging it.
If you choose "Duplicate" from the Edit menu after you peel off a copy with Q-drag, evenly spaced rows will be created in the direction of the first -drag. See Duplicate in the Edit menu for more information.
Note: Q-drag the pink handle to create duplicates in an upward or outward direction.
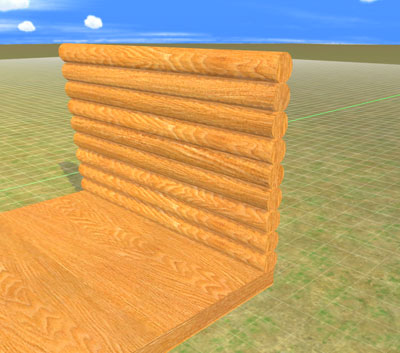
For example, to create a simple log cabin wall, do this:
Draw a cylinder-shaped molding about 8 inches (20 cm) in diameter, along the edge of a floor.
Hold in the Q key and peel off a copy of the log on top of the first. Do this in one motion. If you let go of the log and move it again duplicate below won't work as described.
Choose "Duplicate" from the Edit menu to create a wall like the one shown below:
Apply wood textures to logs as needed:
Molding Shapes
Molding comes in two flavors. Generic shapes you choose from the menus to draw all molding. And Directory molding shapes you can drag from the Molding Directory and drop onto the generic shapes to change them.
Generic Molding Shapes: Choose Build> Draw Molding> and one of the shapes. Change existing molding to another shape by right-clicking and choosing one the shapes options from the "Change Shape" menu (see below). You may also right-click molding and choose "Properties" for other shape options.
Directory Molding Shapes: Drag Directory molding shapes onto molding you've already drawn. choose from hundreds of base, crown, chair rail and other molding styles and sizes under Building Materials> Molding.
How to apply directory molding:
Choose Draw Molding>Rectangle from the Build menu.
Draw six feet of molding on the wall.
Find crown molding under Building Materials> Molding.
Drag a crown molding shape onto the molding you drew.
|
Generic Shapes |
Directory Shapes | |
|
Rectangle
Round Rectangle
Half-Oval:
Oval
Triangle
Triangle |
|
|
Draw with Last Shape
To draw the same molding shape you used last, choose "Draw Molding> Use Last Molding Shape and then draw the molding. This saves you the trouble of choosing the shape over again from the menus.
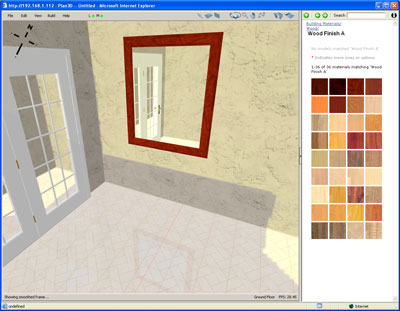
Linked Molding
Molding may be linked to create picture frames, base molding around the bottom of room walls, and so on.
Example:
Draw a mirror on a wall using Build> Draw Mirror
Choose Build> Draw Molding> Rectangle
Draw molding along top of mirror.
Drag a frame molding onto the frame from the directory.
Click on the right end of the molding you drew and draw a new molding piece down to the bottom of the mirror. Note: If you accidentally exit molding mode, choose "Draw Molding>Use Last Molding Shape" from the Build menu to continue with the same shape.
Click the bottom-right piece of molding and draw to the next side.
Draw from the bottom to the top of the mirror to complete the linked frame.
Frame edges may be dragged to get the size right.
Note: Linking molding around corners takes a little practice. Make sure the starting point of the molding on linked walls is within a foot or so of the molding end on the other wall.
Reattach to Parent Slab
If you drag the molding away from the wall, floor, countertop or roof you drew it on with the pink handle, you can reattach it by right-clicking the molding and choosing "Reattach to Parent Slab" to put it back.
Framing Mirrors and Paintings
Use molding to frame paintings or mirrors. The steps are the same for both except you would use Build> Draw Material for paintings instead of Build> Draw Mirror.
This method may also be used for casing doors and windows as well as framing holes in walls and other things.
Ceiling Beams
Ceiling beams may be created using rectangular molding and duplicating it along the ceiling line spaced as needed. Set beams to any size with "Set Dimensions."
Log cabins, planked walls, trelises and other types of structures may also be created quickly with the Q key and Edit> Duplicate
Example:
Custom Crossbars
As you've seen, Q-key and Duplicate are very flexible when used with molding.
In the example below we will create custom crossbars for a window. We created the first frame in the example below using Build> Draw Window (custom) and removed the default crossbars by right-clicking the window.
Example of Custom Crossbars:
Base Molding
Base molding, both interior and exterior, can be drawn with Generic Shapes which you can resize as needed - or drag base molding shapes from the Directory onto molding you've already drawn.
Draw molding along the wall in elevation or 3D modes as desired. If needed, raise or lower the first span to align with the floor. Get the first span correct and the others will follow along. When you continue drawing base molding along linked walls the molding will link in the corner with a mortised cut.
You can experiment with base molding shapes after it's put up - just drag other base molding shapes from the directory onto the existing molding or right-click the molding and use a generic shape.
Wainscotting and Chair Rails
After you draw a generic molding shaping at the chair rail height, choose a chair rail (Wainscotting) molding type from the directory and drag it onto the chair rail. Corners will be mortised when you link them.
To fill the area between the wainscotting and the floor with wood panelling, wallpaper or other material, see Build> Draw Material.
Use Build> Tape Measure and plumb lines to establish where the chair rail will go before you draw it. Get the first span of chair railing correct and the others will follow along correctly.
Draw molding along the wall in elevation or 3D modes as desired - then drag the type of chair railing you want from the Directory onto the molding you drew. You can experiment with wainscotting after it's put up - just drag in chair rail shapes from the directory onto the molding or right-click the molding and use a generic shape.
Example:
Crown Molding
Crown molding is drawn along the ceiling or higher up on a wall for decorative purposes. Sometimes lights are also placed behind the molding. Crown molding is also used on building exteriors.
Use Build> Tape Measure and plumb lines to establish where the molding will go before you draw it. Get the first span of crown correct and the others will follow along correctly.
Draw molding along the wall in elevation or 3D modes as desired - then drag the type of Crown Molding you want from the Directory onto the molding you drew. You can experiment with the crown molding after it's put up - just drag in shapes from the directory onto the molding or right-click the molding and use a generic shape.
Example:
Pergola (Covered Deck or Porch)
Molding may also be used to create pergolas, log homes, house framing and other things.
Remember that molding can only be drawn in relationship to a floor, wall or roof. Hold in the Q-key and drag a piece of molding to peal off the initial copy - and then create multiple copies of it in the same direction by using duplicate in the Edit menu.
Pergola example: