 Draw Floor
Draw floors in any viewing mode except elevation.
Use Floors for:
|
|
Contents
Adjust Floor Height
Reflectivity
Draw Floor
Floors are rectangular slabs used for floors, stair landings, sidewalks, driveways, flat roof tops and porches.
When you draw the final wall in a series of linked walls, a floor will be created automatically. However, you may also use floors for lawns, driveways, garage slabs, and other things.
Steps to drawing a floor
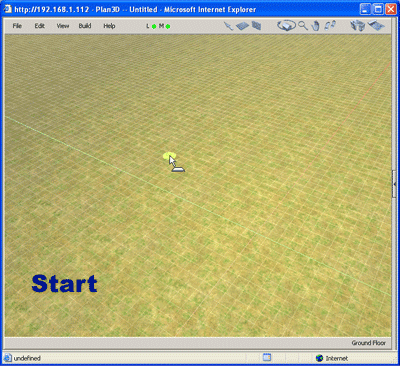
Choose Draw Floor from the Build menu or click the tool bar floor icon.
Set the grid level to the height above ground you want the floor to draw on. For example, if you want the floor to draw on the second floor, Move Work Grid to the second floor.
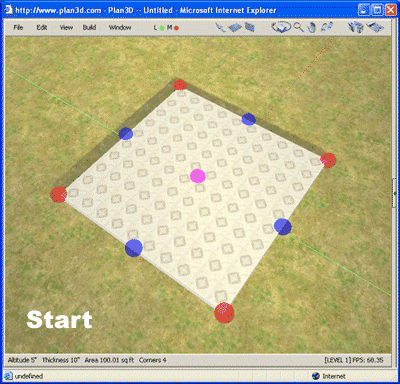
Click-and-drag to make floor - dimensions are shown as you drag.
Apply floor coverings (like carpet, tile, cement, grass and so on) to any side of floor by dragging it in from the Directory. See Materials and Textures.
To apply a material to just part of a floor use Build> Draw Material.
Example:
Adjust Floor Size
Floor Length and Width are adjusted with the blue handles. Ctrl-click floor edges to add (or delete) new red handles you can drag to create any shaped floors.
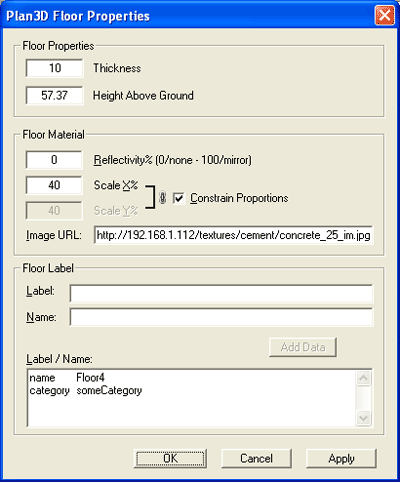
Floor Thickness is adjusted by right-clicking the floor and choosing "Set Floor Dimensions..." or by right-clicking the floor and choosing properties.
Adjust Floor Height
Floors draw at the height of the current Work Grid, on top of other floors or on the terrain - whichever is higher.
There are several ways to adjust the height of existing floors:
Drag the pink handle in the center of a floor up or down. You'll see the height above the ground as you drag.
Right-click the floor and choose Properties. Set the floor's "Height Above Ground" there as well.
Right-click floor and choose "Move Floor Vertically To..." a specific height.
Right-click the floor, choose "Properties" and set reflectivity as a percentage - where a mirror is 100% and no reflectivity is zero.
To turn on reflections see
Edit> Improve Edit Speed> Turn
Off Reflections or just press the "M" key. The green dot
next to the "M" on the tool bar indicates reflections are on.
Note: Reflectivity requires more rendering power because plan3D has to
re-render this reflect image in the countertop. This requires plan3D to
do double-rendering. If you have a slow computer or video card you should
probably turn off reflections when you're editing. See Edit> Improve
Edit Speed for more information.
Other Floor Levels
Consider the height of upper levels before you create floors. The default height between floors is dictated by the default wall height, which you can define under Edit> Preferences> Walls.
To draw a floor on the second floor, choose Edit> Move Work Grid and set it to the second level (or press the two key). When the grid is at the proper level then draw the floor there. Floors draw at the height of the current work grid, on top of other floors, or on top of terrain - whichever is higher.
To create split-level floors, for a sunken living room for example, draw the floor then raise or lower with its center handle. You may also right-click the floor and choose "Move Floor Vertically To...", or choose "Properties" and adjust it.
When creating structures with upper floors consider using File> Building Wizard.
Blueprint Level Visibility
Blueprint shows only the walls and objects that are on the current Work Grid Level.
For example, if the work grid is on level two, then you're not going to see the walls, furniture, cabinets or other objects that are on level one. See Work Grid Level for more about this.

Select Floor
Select floors in several ways:
Double-click floor
Right-click floor and choose "Select Object"
Click the selection tool and single-click the floor
When you see handles on the floor you know it is selected.
Delete Floor
Select the floor and press the Delete or Backspace keys. You may also right-click the floor and choose "Delete" from the pop-up menu.
Move Floor
Click on the floor (not the handles) and drag it. You won't be able to drag floors inside of other floors.
Hide Floor
Right-click a floor and choose "Hide."
Hide all floors with Hide> Floors (all).
Hide all floors except the current floor, including all the furniture and other objects on other floors, with Hide> Floors (except current)
Lock Floor
Sometimes floors get in the way of editing and are accidentally clicked or moved. Right-click the floor and choose "Lock" to secure it from inadvertent movements.
Floor Coverings and Materials
Drag floor coverings, like tile, carpet and wood flooring
materials onto floors from the Directory. Cement paint stains and color
may also be applied to floors. See
Paint
and Color and Material and Textures
for more information.
Applying different materials to floors makes them something else:
|
|
To Cover Part of a Floor see Build> Draw Material. For example, use this to draw a tile floor in a bathroom without putting tile on the rest of a floor.
Reshape Floors
Reshape floors by adjusting the red handles. Add red handles by holding in the Ctrl key and clicking floor edges. Delete red handles by Ctrl-clicking them also.
Disable Snap To: When dragging red floor handles they will snap to edges and corners. Disable "Snap To" by holding in shift when dragging red handles.
Duplicate Floor
Floors may be duplicated by selecting them and choosing Edit> Duplicate or by holding in the Q key and dragging. Duplication of floors occurs on a vertical plain. In most cases you'll duplicate the floor above the current floor.
See Edit> Moving Work Grid for ways of drawing floors on the grid at upper levels.
Floor Properties
Set floor properties by right-clicking and choosing "Properties":
Floor Properties set thickness and height above ground here.
Floor Material shows the material's file URL (where it came from.)
Reflectivity may be adjusted between 100% (mirror) and 0% (flat).
Scale material by percent. 50% would equate to a 50% of original size.
Also see Materials and Textures for ways to modify scale, rotate, move, and use your own materials.
Floor Label labels walls for the Help> List of Materials.
Create custom floor labels:
For example, to change the label "name" to "Bathroom floor", and "category" to "Bathroom" do this:
Enter "Name" in the Label text box.
Enter "Bathroom floor" in the Name text box
Click the "Add Data" button
Cut Holes
Cut holes in floors with Build> Cut Hole.
Trap Doors
To put a trap door in a floor, use Build> Draw Door (custom)
Landings
Landings are just floors between floors which stairs climb to before changing directions. See Build> Draw Stairs for more information.
Curved Floor, Rounded Floor (this also works for curved sidewalks, curved
driveways, curved countertops, etc.)
In plan3D you must add points to the outside of a floor using ctrl-click and then hold in the shift key and move the points appropriately.
Steps:
Choose the Your Shapes>Cylinders shapes from the Directory.
Choose one the shapes that is closest to the curve you want. Half cylinder, twelve sided, eight sided, etc. and drag it into your plan.
Right-click on the cylinder and set the width/depth to the size for the curved wall you want.
Put the shape where it's supposed to go in your plan.
In blueprint mode, use the curved shape as reference and draw a floor aligned to it as needed.
Ctrl-click on the edge of the floor and while holding in the shift key move the handle to a point on the cylinder reference. Continue doing this until the floor is the shape you want.
When the floor is the shape you want you delete the cylinder you used for reference.