 Construct Roof (custom)
Unlike Build>Draw Roof which creates only Gabled and Hipped roof types, Construct Roof (custom) lets you created unlimited combinations of roofs.
Some roof types you can create:
Contents
Construct a Custom Roof
This example creates a simple shed roof on four walls with one wall raised:
Choose Build> Construct Roof (custom).
Cursor changes and you'll see handles.
Click handles in a clockwise direction. You won't see the roof segment until you click the third handle (takes at least three points to define a plane.)
Example:
Important Note: Roof segments are not attached to each other. They are separate independent objects that can be moved.
What is a Roof Segment?
A roof segment is a flat plane with at least three points. A segment may be any number of points as long as they're on the same plane. If you try to add points that are not on the same plane, they will be adjusted to fit on the plane defined by the first three points.
Roof segments are not linked. They may be moved independently.
Click Points
When you choose Construct Roof (custom) you will see handles on roofs, walls, floors, columns, posts and other things. Any of these handles may be clicked to define a roof segment.
If you see handles you can anchor a roof to them.
Piecing Segments Together
Roof segments are constructed one segment at a time:
Choose "Construct Roof (custom)" to add a roof segment.
Click the three red handles on the left in a clockwise direction.
Start a new segment by choosing "Construct Roof (custom)" again.
Click the three red handles on the right in a clockwise direction.
Double-click or press Esc to exit roof mode.

Gambrel Roof Example
Gambrel is a common roof style that has four roof segments. Follow the steps below to create a simple gambrel roof:
In 3D or blueprint mode, draw a wall 16 feet long by 9 feet high (108 inches)
Switch to elevation mode so you see the view in figure 3.

figure 3.
Ctrl-click in the center of the wall top and raise the new red handle to 15 feet Figure 4.
Choose Build>Dimension>Insert Custom Dimension and add a dimension 40" from the left wall. Figure 4.
Use the tape measure to measure and draw it even with the right edge of the measurement up to wall peak level. Press Ctrl+K to add the plumb line shown in Figure 4.
Ctrl-click on the left wall top and drag the red handle up to 12' 6" as shown in Figure 4.
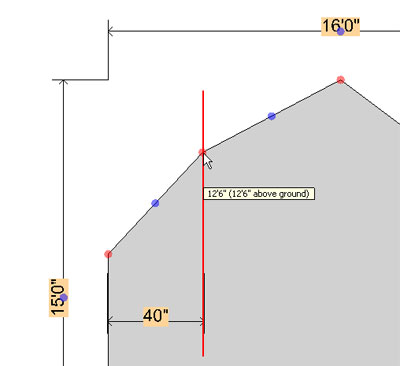
Figure 4.
Repeat steps 4 through 5 to create the right gambrel peak 12' 6" high and 40" from the right wall. Figure 5.
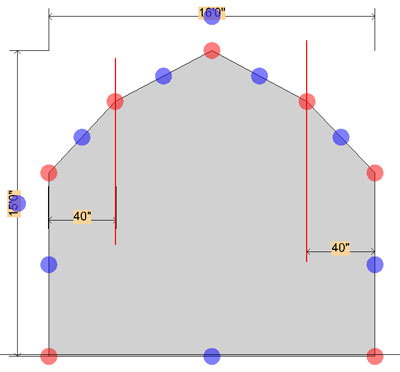
Figure 5.
Go to blueprint mode. Choose Build>Dimension>Draw Custom Dimension and draw a measurement 18 feet (Figure 6.)
Hold down the shift and Q keys and click-and-drag the wall to the 18' mark as shown in Figure 6.
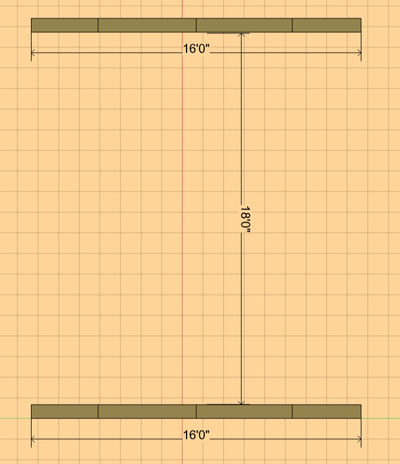
Figure 6.
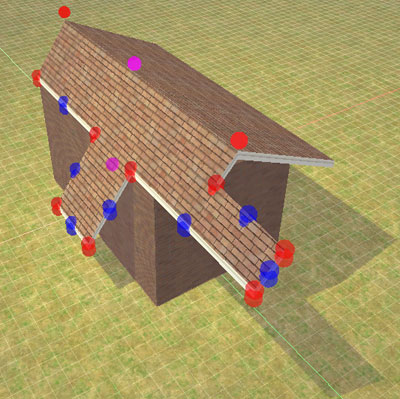
Now switch to 3D mode and choose Build> Construct Roof (custom). You'll see red handles and the cursor will turn to a roof.
The gambrel roof is four segments. So you'll need to click the four red handles one segment at a time as shown in the Figure 7 animation.
Select
Roof segments are independent entities. Select a roof segment by clicking or double-clicking it.
Height
Adjust the pink handle in the center of the roof up or down.
Delete
Select a roof segment and press the delete or backspace keys. Or right-click it and choose "Delete" from the pop-up menu.
Move
Click-and-drag it.
Hide
Right-click a specific roof segment and choose Hide from the pop-up menu. Hide All Roofs and Roof Segments by choosing View> Hide> Roofs - or R key. Show Roof Segments by choosing View>Show All.
Lock
To lock a roof segment so you can't accidentally change it, right-click it and choose "Lock." Unlock the same way.
Right-click the roof segment, choose "Properties" and set reflectivity as a percentage - where a mirror is 100% and no reflectivity is zero.
To turn on reflections see
Edit> Improve Edit Speed> Turn
Off Reflections or just press the "M" key. The green dot
next to the "M" on the tool bar indicates reflections are on.
Note: Reflectivity requires more rendering power because plan3D has to
re-render this reflect image in the countertop. This requires plan3D to
do double-rendering. If you have a slow computer or video card you should
probably turn off reflections when you're editing. See Edit> Improve
Edit Speed for more information.
Modify Edges
Drag blue or red handles on roof segments to extend roof edges or sides. Hold in the shift key to disable snap to when dragging.
Create custom overhangs and other roof edge adjustments by holding down the Ctrl key and clicking on roof edges. Use the Ctrl key to delete red handles.
Paint and Materials
Apply shingles to roofs by choosing them from the Directory and dragging them onto a roof tops. Do the same thing with ceiling materials and edge siding.
See Paint and Colors and Materials and Textures for more information.
Cut Holes
Use Build>Cut Hole to cut holes in your roof segments.
Skylights
Skylights may be dragged onto roof segments from the Directory> Building Materials> Windows> Skylights (Velux).
Dormers
Dormers may drawn on roof segments using Build>Draw Dormers.