 Cabinets
Cabinets are used in kitchens, bathroom vanities, closet cabinets, carport and garages and office desk and design. This page will show you how to install cabinets in a kitchen. The basic concepts are used in other rooms as well.
Contents
Draw Countertop on Base Cabinets
Floor and Wall Materials and Paint
Create a Room
Create a kitchen, bathroom, closet or laundry for the cabinets using the Room Wizard - or draw walls manually in blueprint or 3D views.
Add Doors and Windows
Add doors and windows to walls before you put in cabinets. Check height and distance from interior wall ends so cabinets fit properly. Use the Tape Measure or Dimension tool in the Build menu or position doors and windows in Blueprint mode to see distance from exterior wall ends (subtract wall thickness to calculate interior dimension if needed).
Choose a Style
All cabinets in plan3D have the same basic construction but sizes, door styles, wood styles and colors can be changed to suit your needs.
Door Styles come in five basic styles. When choosing cabinets choose the door style first in the Directory before choosing sizes.

Wall Cabinets are the same for all rooms. They are all 12 inches deep (30.48 centimeters) and come in a variety of heights and widths. Choose these in the Directory. Be sure to click the link under the cabinet thumbnail for more sizes.
Convert Wall Cabinets to Free-Standing: If you want on-wall cabinets to be free standing (or any other on-wall or in-wall or other 'Must Attach' objects), drag them in while holding in the shift and underscore "_" keys. This will allow it to be moved around like other free standing objects.
Base Cabinets come in different heights and depths for different rooms. For example, Office cabinets come at desk height. Keep in mind these are typical sizes and may be adjusted with right-click and "Set Dimensions..." Be sure to click the link under the cabinet thumbnail for more sizes.
|
Kitchen base cabinets |
Bath base cabinets |
Office base cabinets |
|
inches: centimeters: |
inches: centimeters: |
inches: centimeters: |
Add Base Cabinets
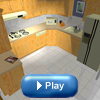
After you choose a style, put in corner and sink cabinets first by dragging-and-dropping them from the directory. Hold in the shift key if snap to becomes a problem. Aligning cabinets to walls is easiest in blueprint mode. If you have broadband what how these kitchen cabinets are assembled in plan3D:
To nudge cabinets into position - select them - then use the cursor keys to move them in small increments. You can set the nudge amount under Preferences in the Edit menu.
Fit other cabinets as size permits. Use the tape measure to determine room remaining. Snap to is a usually a convenient way to fit them together. Remember, you can always delete cabinets you've put in and replace them other sizes to get the desired look.
For peninsulas or island cabinets use peninsula cabinet types so there are doors on both sides and ends.
Videos Examples: See kitchen cabinets and countertops being assembled.
Draw Countertop on Base Cabinets
When you get all the base cabinets in you will need one countertop for each connected group of base cabinets and islands.
Do not put a countertop
on each individual cabinet. This video shows how one countertop can cover
all base cabinets by Ctrl-clicking and extending them.
Draw Countertop on Base Cabinets by choosing Countertop from the Build menu. Position the green transparent circle on top of a base cabinet before drawing. Adjust height above countertop with its center handle if necessary or delete the countertop and start over.
Add Back-splashes to countertops by right-clicking a side and choosing "Add back-splash." Right-click countertop and choose Properties to set back-splash height, reflectivity, thickness, etc.
Put Tile, Formica and other Materials on Countertops by dragging them in from the directory. Hold in the alt key to apply materials to all sides of a countertop.
Sinks and faucets can be dragged onto countertops. You may need to jiggle wide sinks a little to fit them into tight countertops or, if necessary widen the countertop to fit it on.
Countertops on Angled Islands can be accomplished in the following manner.
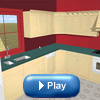
After you've put in your base cabinets put in wall cabinets by dragging them in from the directory and dropping them on walls. Use the nudge to nudge corner cabinets into position in blueprint mode. When you put wall cabinets within 8" of another one they will snap together. Hold in shift if you need to disable snap to.
The animated below will give you an idea how wall cabinets are added.
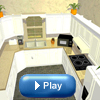
Islands and peninsula's are created using peninsula base cabinets and if desired, using peninsula wall cabinets over them.
See the wall cabinet and peninsula example below.
Click here for an example of putting a countertop on an angled island cabinet.
After you've put in your base cabinets put in wall cabinets by dragging them in from the directory and dropping them on walls. Use the nudge to nudge corner cabinets into position in blueprint mode. Snap cabinets together in most cases. Hold in shift to disable snap to.
Cabinet Colors and Wood Stains come in many varieties in the directory. For example, choose "Wood" from the Building Materials category to get a variety of wood stains and styles you can drag-and-drop onto cabinets. In addition, you can apply a white texture for white cabinets or a white wood grain texture and apply any color from the Build>Paint menus to those. You may also create your own textures for the cabinets in jpg format and apply them with drag and drop.
Choose paint colors from the Directory.
Floor and Wall Materials and Paint
Put in tile or other floors. Add wall materials like textured drywall, wallpaper or paint colors. Get design and color ideas from different web sites by searching on Google or Yahoo.
Drop refrigerators into kitchens, commodes, tubs and showers into bathrooms, and any other items you need into your designs to make your rooms look the way you want.