Using the  Directory
The Directory contains 3D objects, colors, paints and materials (textures.)
Contents
Directory Contents
 The Directory
contains thousands of 3D objects like furniture, trees, doors, and windows
for your plans. There are also shapes you can apply to molding, fences,
posts and columns.
The Directory
contains thousands of 3D objects like furniture, trees, doors, and windows
for your plans. There are also shapes you can apply to molding, fences,
posts and columns.
It also contains materials, colors and paint samples you can apply to those objects, as well as walls, floors, stairs and so on.
Drag 3D objects from the Directory and drop them into your plans. Drag materials, colors and paint samples on 3D objects, walls, floors and other surfaces.
3D Objects
There are three types of 3D objects in the Directory.
Regular
3D Objects
Most objects can be dropped anywhere in your plan.
Regular object examples include, sofas, tables, beds, bookshelves, desks, televisions, trees, bushes, table lamps, and many other things.
Create Your Own 3D Objects
Use the "Your Shapes" category to put shapes together to create your own objects. You can resize the shapes, group them and apply textures or colors to them as well.
3D
Objects that Attach to Walls, Roofs, etc.
Some objects must be attached to walls, countertops, roofs or floors when
you drag them in. This includes doors, windows, sinks, wall cabinets,
security doors, and so on. If it seems like it needs to be attached, it
probably does.
Drag the object over the appropriate surface, wait until you see it, then release the mouse to drop it. Just because Plan3D is flexible enough to allow you to attach a window to a floor doesn't mean you should do it.
Must Attach: If there isn't a wall in the project you can't drag in a window. If there isn't a ceiling you can't drag in a ceiling fan. Exception: You may convert on-wall, on-roof, in-floor, and in-wall objects to free standing objects by holding in the shift and underscore keys when dragging it in. For example, if you wanted to create a kitchen cabinet layout without walls - you could drag in the cabinets while holding in the shift and underscore "_" keys when dragging them in.
Object
Loyalty: Objects attached to a surface cannot be dragged off that
surface or moved to another. You may select and delete them.
Convert Objects to Free-Standing:
If you want an on-wall, in-wall or other 'Must Attach' objects to be free
standing, you can do this: If
you want to insert a kitchen cabinet layout without attaching to a wall
- drag in the wall cabinet while holding in the shift and underscore "_"
keys. This will allow it to be moved around like other free standing objects.
3D
Shapes You Apply to Molding, Fences, Posts, etc.
There are several types of building objects that accept shapes from the
Directory:
Molding:
Use Build> Draw Molding to draw
base molding, crown molding and generic molding shapes onto walls, floors,
etc. Replace molding you drew with other molding shapes by dragging them
in from the Building Materials> Molding categories in the Directory
ON TO the molding in the plan area.
Fences and Rails:
Use Build> Draw Fences and Rails
to create fences or guard rails in your plans. Replace picket fences you
drew with wrought iron and other fence shapes you drag in from the Building
Materials> Fences category by dragging them from the Directory onto
the Fences and Rails in your plan.
Posts and Columns:
When you use Build> Draw Posts and
Columns to put these in your plans, you can replace them with other
types of posts and columns - as well as add capitals and bases - by dragging
them in from the Building Materials> Posts and Columns category in
the Directory - ONTO THE POSTS AND COLUMNS IN THE PLAN. This also allows
dragging rails and fences onto posts and columns.
Materials and Textures
Materials and textures are images - like the kind you get from a digital camera - you apply to surfaces to make them look real. For example, drag bricks onto walls, upholstery onto sofas, wood finishes onto cabinets, and tile onto floors.
Use drag-and-drop to apply materials from the Directory to surfaces. You may also drag in your own JPG, GIF, BMP and PNG files and images from web pages onto surfaces.
See Materials and Textures for more information about this.
Paint and Color
The Paint and Color categories contain colors and paint samples you can drag-and-drop onto surfaces in your projects.
There are also paintable materials you can apply to surfaces that accept color and paint well. Use drag-and-drop to apply these to surfaces.
See Paint and Color for more information.
Directory Layout
Main Directory
Categories are organized by room and logical groups. For example, objects you would expect to see in a bathroom are in the bathroom category. Objects you would expect to see in building materials, like bricks and tile, are there.
Sometimes object categories are repeated to make finding things easier. For example there is an Art category in Living Room and the same category is in the Bedroom category as well.
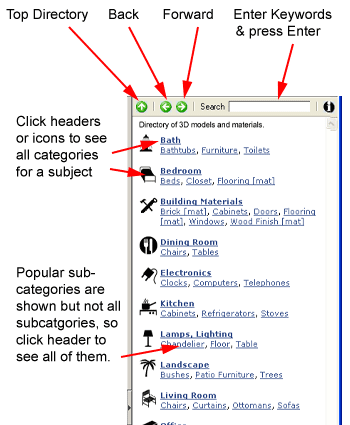
The Directory is set up to make finding and obtaining what you want easy. Use the back and forward keys like you do in your browser. The up arrow moves you to the Main Directory from anywhere.
To see all sub-categories for a subject link, click it or the little icon next to it.
 Sub-Categories
Only commonly used sub-categories are shown in the Main Directory because
of space limitations.
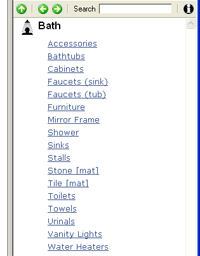
For example, in the Main Directory above, there are three sub-categories under Bath. However, when you click the Bath link or icon you get the full list of Bath categories shown on the right. As you can see, the Bath category contains many more then three sub-categories.
Some sub-categories themselves contain sub-categories. When you get to a sub-category which has no more sub-categories, you'll see thumbnails of the 3D objects or materials (below). As you drill deeper into categories you'll see a link path you can use to back up to previous sub-categories.
 Thumbnails
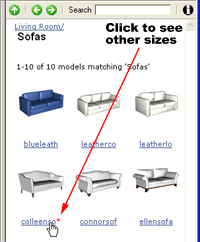
The sub-category on the right contains thumbnails of 3D sofa objects you
can drag-and-drop into your project.
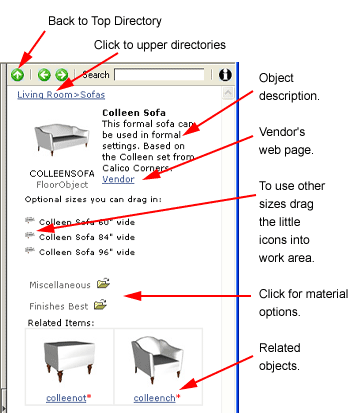
Click links under thumbnails to get details (below).
Red asterisks ( * ) after a link, indicate other sizes are available for.
Object Details
Click the link under a thumbnail to get object details. Materials don't have a description page.
If there was an asterisk next to the link you'll see little icons to the left of the available sizes, which you can also drag into your plan.
Drag in the closest size and resize it as needed after you drag it in.
Object Type Note: FloorObject below means the object can be dropped anywhere, like on a floor. In-Wall objects are things like doors, windows, fireplaces that must be dragged over a wall. On-wall objects are things like kitchen cabinets, picture frames, etc.